Since making the two practice layups (first here and second here), I asked around what the ideal cloth/resin ratio should be, and the consensus seems to be that a reasonable amount of resin to get to with an open layup without letting air in is about a 60:40 weight ratio of cloth and resin. Vacuum bagging can get you to down to 70:30. Rutan seems to agree with this as the plans say at one point that if “you’ve done an excellent job, the resin should weigh about half of the cloth”, which would be 67:33.
My previous layups weighed 9.9 and 10.9 oz with 6.5oz of fiberglass, which comes out to be 66:34 and 60:40. So, contrary to my earlier conclusion, they do not seem to be overly dry. Certainly the first had lots of air in it, but it seems more that the problem was that the resin did not wet out the cloth rather than there being too little of it. I deliberately tried to make the second more resin rich, and it also had peel ply, which tends to add a bit of resin at the surface.
I also came across John Slade’s “building tips” page from when he built his Cozy, and he advocated what he called the “plastic peel-ply technique”, wetting out the glass between two sheets of plastic. I’d tried that before (I did on the first practice layup), but I’d never tried keeping the plastic while curing. The point of peel ply is to avoid having to sand, and using plastic you’d get a super shiny surface that definitely would need to sand dull before laying up over. The big advantage that John pointed out, however, is that you can squeegee the layup very agressively without disturbing the fabric and without getting air in. In that sense it has some of the advantages that vacuum bagging has. Air can only enter the layup at the sides, so you don’t have to worry about the top fibers getting too dry. I decided to give it a try.
This time I started with the glass between two dedicated sheets of plastic. I quickly wet out each of the 6 layers of BID and didn’t worry about getting the layup too wet or about getting every little air bubble out. When all six plies were on, I put the top plastic on and started squeegeeing. This worked well. (And it’s so clean, because all the epoxy is under the plastic!)
After getting the fabric pretty well laid up, I turned the sandwich over and discovered plenty of air trapped on that side. More squeegeeing. There were also small, round regions where the epoxy didn’t look like it wet out the fabric. I realized these must be my fingerprints, I had gotten sloppy and cut the glass without wearing gloves. I’ll think about this in the future.
Once all the major air bubbles were gone, I continued heating the layup with the air gun and squeegeed hard. And wouldn’t you know it, little bubbles would form! I even took to rubbing the plastic with my thumb, and a bubble would form. These must have been stuck to the fibers as invisible, microscopic air bubbles, and enough of them were dislodged by the hard squeegeeing to merged into a visible one. After laying into the sandwich for a while, no more air would show up and I called it a day.
After curing and trimming, the new layup looks like this, compared to the earlier two:
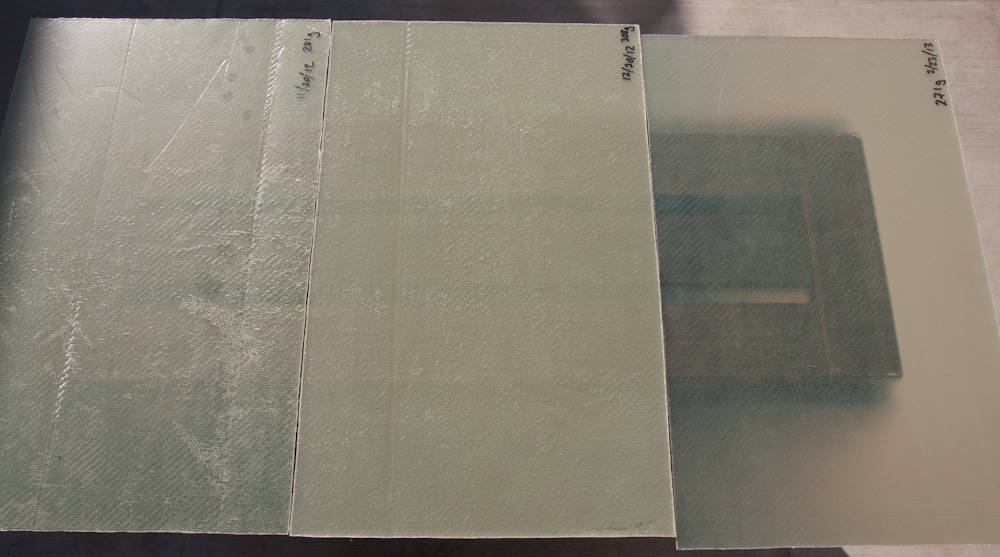
The three flat layups. The newest is on the right. Note how much more transparent it is than the other ones.
See how transparent the new one is. This is partially because the plastic made the surfaces flat (especially compared to the middle one which had peel ply), but the difference compared to the earlier ones is striking. There are none of those white, dry-looking air bubbles.

The new layup on the right has a lot less of the little white “flecks” of air than the earlier one.
The new layup weighs 271g, or 9.55oz. This gives it a 68:32 cloth to resin ratio, which is pretty amazingly good. It really is like a vacuum-bagged part.
I also measured the thickness of the three layups. The oldest one is 1.65mm, the second 1.75mm, and the last one 1.50mm. It’s pretty clear that the more resin you have, the thicker the layup gets, as well.
Fabric weights
So why was I confused about the ideal weight before? It could be that the plans are wrong, but the more likely conclusion is that the fabric I have weighs less than the one the Long-EZ plans assume. If we assume that the ideal weight of 11.0oz that the plans call out is based on the 2:1 cloth to resin ratio that another section says is “an excellent job”, that would give a cloth weight in the piece of 7.3oz. The 8.8oz/yd^2 BID that I got from Aircraft Spruce would weigh 6.5oz. Thus, it seems the BID used in the plans must have weighed 9.9oz to get the numbers to work out.
Unfortunately the plans don’t specify the fabric weight, only a thickness of 0.013″. If we take the thickness to be 1/6 the thickness of my finished piece, that comes out to be 0.010″, also significantly thinner.
This is pretty worrisome, because the cloth weigh of course determines its strength. If my cloth is 13% lighter than what the plans call for, my parts will come out weaker. In very thick layups, this can be fixed by adding another ply, but most of the layups are 2-3 plies. Adding another ply there will mean ending up with a significantly heavier airplane.
What’s weird is that all indications seem to point towards the fact that the BID used for the Long-EZ is the same one used for the Cozy Mk IV, which is Hexcel’s 7725. This is also what Aircraft Spruce sells. Did Hexcel change their product at some point since 1980? I’d better figure this out before I start building for real.
Pingback: The Bookend | Patrik's projects
Hey,
When you made your third layup, did you leave plastic on, or take off after sqeegeing? I used wax paper and can’t separate it from fiberglass.
I left it on. The 3mil plastic comes off really easy once the epoxy is cured. You just have to watch that you don’t get epoxy on top of the plastic, then it would be difficult.