One of the things I’ve worked on with N132EA was to clean up the wiring. As some of you may know, the importance of neat wiring work was ingrained in me from a young age working for the electrician at my Dad’s job during summers. Things were required to be done neatly, any wires crossed in bundles, not routed at right angles, not sufficiently supported, etc, resulted in a do-over with the comment “that looks like the phone company (Televerket) did it!”. He was not a fan of the phone company wiring practices…
As I was going through the Sonex, familiarizing myself with the systems and how everything is set up, I felt an irresistible urge to clean up the wiring. This is kind of what I was presented with:
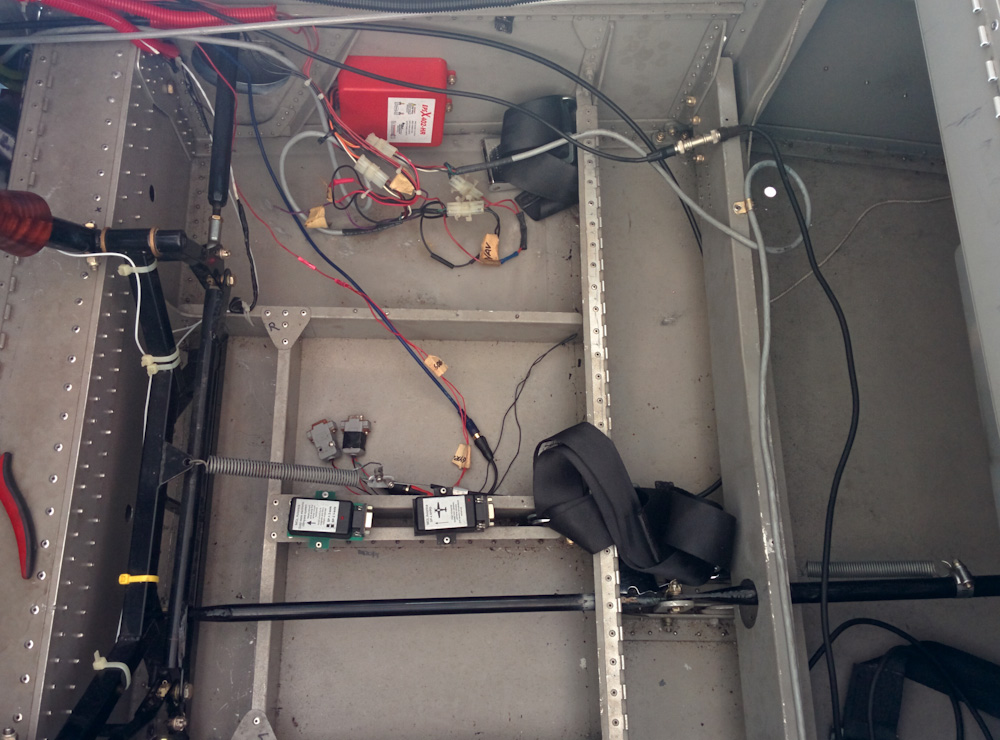
This is what the under seat wiring looked like. a rat’s nest of wires, connectors and splices with bad crimps, and wires unprotected from the sharp aluminum edges. The two boxes in the center of the picture are the IMU (electronic gyro) and compass connected to the EFIS.
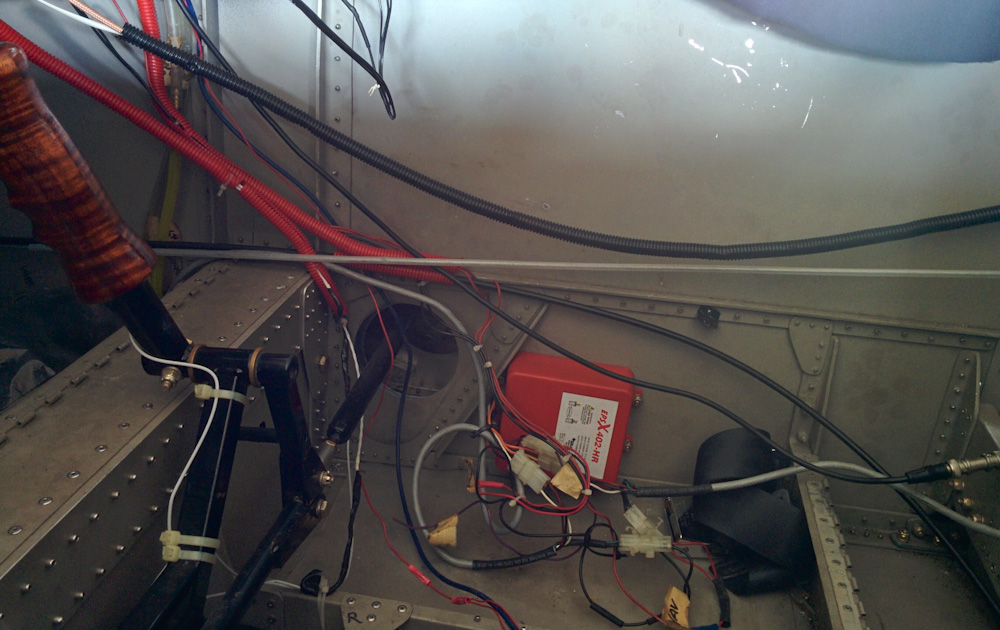
The wires along the right side of the cockpit, mostly routed in plastic split tubing and the com radio antenna coax hanging unsupported.
Where the wire bundles were protected, they were run in hard plastic split tubing (seen in red and black). I’m not a fan of this, it’s sharp enough to scrape your skin on the edges, and it does’t hold the wires in very well so the wire bundles were working their way out of them in several places. The wire bundles were also mostly hanging freely, free to get snagged on anything moving in the cockpit.
The worst part of it, though, was the use of crappy automotive splices (like the red one seen under the red strobe power supply box) that weren’t even crimped correctly, they looked like they were crimped with a set of pliers. And, sure enough, several of them came apart on me as I was trying to unsnake the bundles. I also found a few other bad ones, one was the source of the outside air temperature reading bouncing between 0 and 300F whenever the engine was running.
This had to be redone. I wanted all those splices gone, wires properly protected and supported, and finally an orderly routing. Apart from removing the splices, re-crimping the connectors to the nav/strobe lights, and replacing the incorrect transponder coaxial cable (which was a length of RG-58 50 ohm extended with a length ef RG-59 75 ohm) with a fresh LMR200 low-loss wire, no physical changes were done to the wiring.
The wire bundles were protected with flame-retardant Techflex Flexo F6, a soft, flexible wrap that looks good, protects the wires from sharp aluminum edges, and can handle up to 125C. Wire bundles were (gently) held together with cable ties and where there was no existing support, self-adhesive cable mounts were used. This is how it looks now:
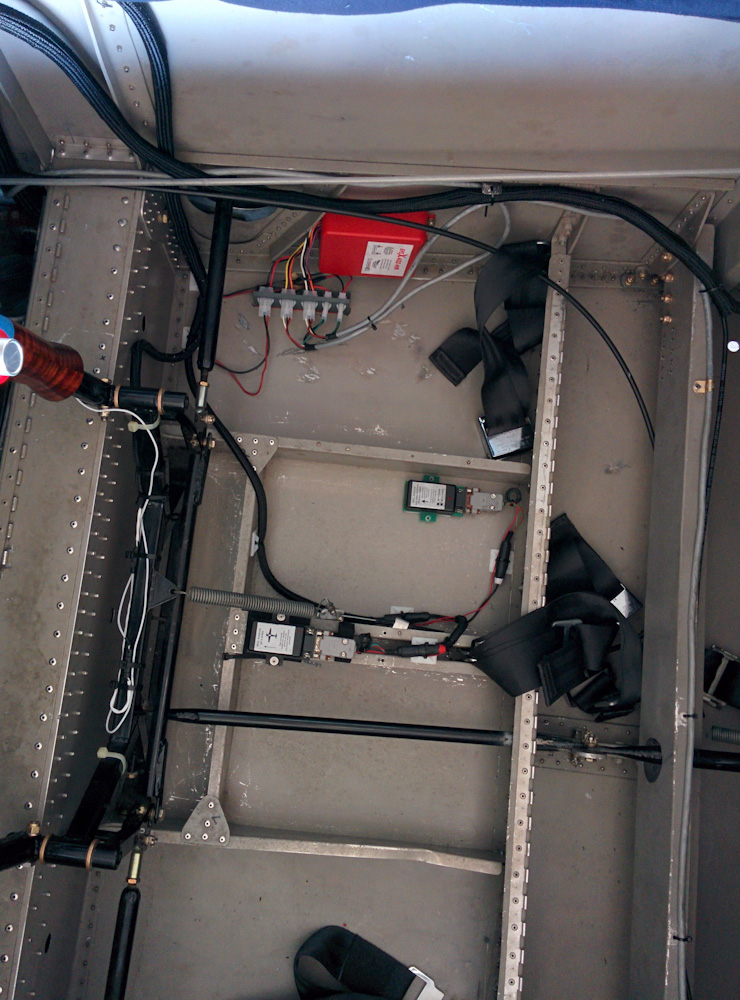
The under seat wiring now. All wiring is supported and protected. The magnetic sensor was moved away from the trim spring and the elevator linkage to minimize disturbances, and the gyro mounted against soft neoprene to minimize vibration while still fixing it much better than before.
The existing connectors to the nav/strobe lights were cut off, since they all had sketchy crimps. Instead, I crimped Molex Mini-Fit Jr. connectors on there, and 3D-printed a small bracket that holds the connectors so they’re not free to move all over the place.

The wiring behind the panel was pretty good, and it’s very handy that there is enough slack in the wiring that you can pull the entire panel out and rest it on the side of the canopy when working on it. I added cable wrap to the bundles, moved the antenna coaxial cables away from the other wires, and made sure there was adequate slack for the connectors and that the pitot/static tubing going to the pressure sensors on the EFIS was not pinched by the cable ties.
I’m pretty happy with the wiring now, the visible wiring looks pretty good and I’ve satisfied myself that there are no remaining dodgy splices that’s going to come apart in flight and no wires rubbing against the edges of the aluminum sheet metal.
I’ve also done some wiring firewall forward, but more on that in a later post.