Along with the carb cleaning, checking the valve clearances on the NC30 going to get done while I had stuff apart. While access is tricky (you have to remove the radiators and pretty much the airbox as well), it was actually easier than on the NC23 because you don’t have to remove the camshafts to change shims. Instead, you just slide the rocker arm off the shim and pick it out, which can be done (after a small amount of swearing to bend your fingers into the right shape) in a few seconds.
One thing that tripped me up was that you are supposed to measure the clearance between the shim and the rocker arm, not between the rocker arm and the cam. It seems physically impossible to me that you’d get different results, since you just push the rocker arm either up or down, but fact is that you do. Measuring between the cam and the rocker gives about .07mm smaller clearance than the correct measurement. Ask me how I know…
The funny thing was that once I measured the correct clearance, they were all too large. Valve clearances go down with time as the valve seat wears and the valve sinks deeper into it, so large clearances can really only happen if there’s crap between the valve and the seat. In that case, the valve won’t seat properly and your compression will suck, but my compression was good. And this was pretty much even across all valves… so I suspect whoever did the previous valve adjustment also measured between cam and rocker and set them all to too large values… It’s like the bike mechanic equivalent of the Keystone Cops has gone over this thing…
The most annoying thing about the doing the valve clearances is that you need to order the correct shims and then wait for them to arrive. And everyone pretty much only covers the .05mm increments, except Honda who has them in .025mm. So if you end up needing the uneven sizes, you can’t even get them from a local shop. The bike pretty much sat around 2 weeks waiting for shims.
But anyway, they all got adjusted. For good measure, I got new valve cover gaskets since there were signs of previous oil leakage in that area. I also looked over the cams, which looked fine with one exception:

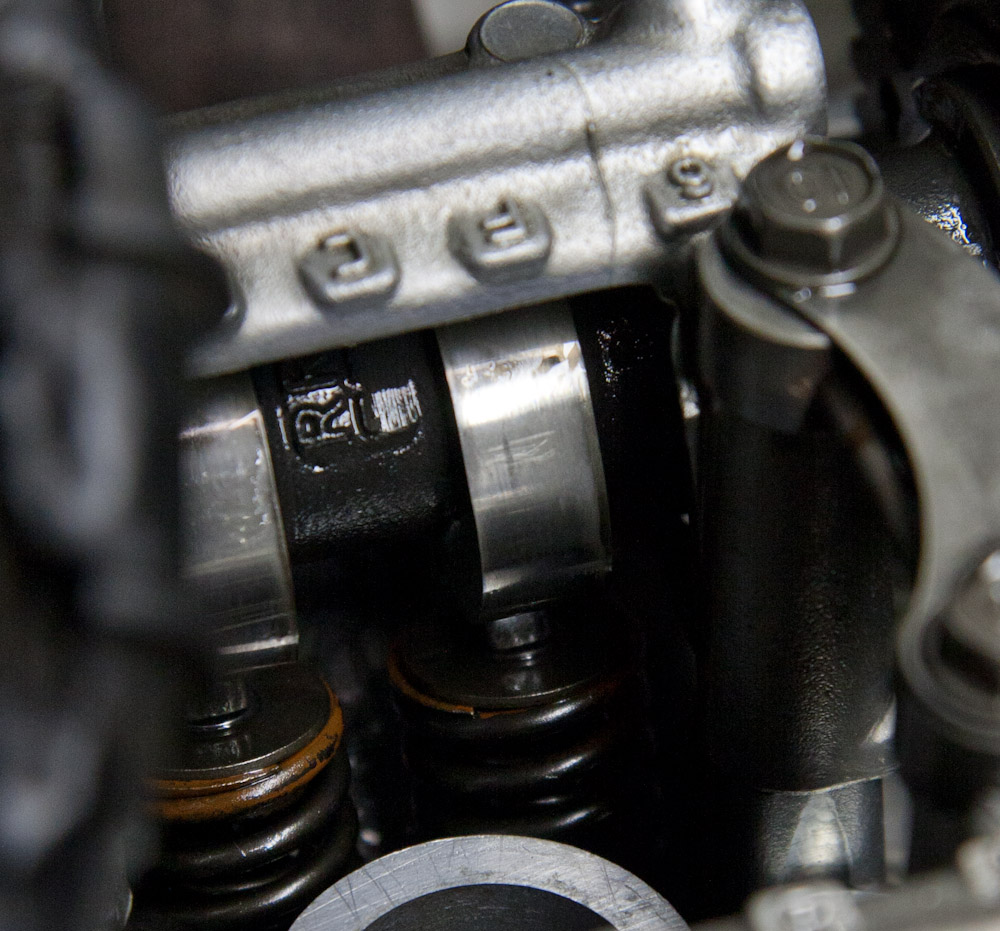
Everything looked good except the inner exhaust cam on cylinder 3, which was scored as seen on this picture. The thin scratch marks were made by me with a screwdriver because I wanted to feel if it was actually a noticeable pit, which there is.
The picture above shows one of the exhaust cams which has a longitudinal black mark on the lifting side where the pressure is the highest. I scratched it with a screwdriver and could actually feel a pit in the surface, so it’s not just cosmetic. Hopefully this is not the beginning of something progressive.
With carbs back on, valves fixed, and a new thermostat fitted (the old one was stuck wide open), I attached a funnel to the fuel line, poured enough in to fill the carbs, and cranked it over. Not a sign of life… Man, what could it be?
Right, kill switch is off… Put it back on “run” and it started right up! Now the final thing that needs to get done before trying it out is synchronizing the carbs. Getting access to the throttle adjustment screws, which are between the carbs on the under side, is not going to be easy. Whoever decided that was a good place should have his head examined…
I’m enjoying these write ups. Keep at it, it is going to be a beauty once it is finished.